Showing posts with label Backyard Cooking. Show all posts

Monday, May 1, 2017

Weber Kettle and some Sandwich Treats

Quite often, I get tired of all the high temp grilling and want something with a little more smoke flavor so I just lower the temps and stretch the cook out a little longer to get some additional flavor for my sandwiches. 

Used the Weber charcoal baskets and Stubb’s briquets with hickory chunks for smoke. Most of the cook was done on the backside of a pair of Grill Grates. 

 photo IMG_0389.jpg

My cook consisted of the following:

Four 1/3 pound 70/30 burger pattties
Five Johnsonville Hot Italian sausage
Six Vienna Brand Chicage type Jumbo Beef Franks 
Block of Jalapeno Spam
And some caramelized veggies

 photo IMG_0392.jpg

My Gen 2 performer doing it’s thing. Meat was cooked at about 250-275 degrees measured on the cooking surface and took a few minutes less than an hour not including the veggies. 

 photo IMG_0393.jpg

Caramelized veggies consisted of onions, red bell peppers, green bell peppers, and sliced jalapeno peppers.

 photo IMG_0394.jpg

 photo IMG_0395.jpg

Results of the cook.

 photo IMG_0396.jpg

 photo IMG_0397.jpg

Hot Italian sausage sandwich with some of the caramelized veggies, tomatoes, and mustard and a Jalapeno Spam Slider with caramelized veggies, lettuce, tomato, and mustard.


The cook came out great and sure made a nice lunch.

Tuesday, February 10, 2015

Weber Jumbo Joe / Spare Ribs and More

The next few articles will be on the new style Weber Jumbo Joe kettle cooker which I find is one great little cooker for tailgating, beach, picnics, camping, apartment living,  etc.. Promise to do a complete review at a later date.

This first cook was done on a very cold morning with the ambient at 21degrees and the wind out of the North at about 14-17mph with a wind chill in the single digits. Kinda takes some of the fun out of the cook. 

I planned to cook a slab of spare ribs, some pit beans, and some potato wedges on the Jumbo Joe kettle.

I started by making up my pit beans in a glass loaf pan and added some brown sugar on top of the beans. I then trimmed, skinned, and scraped some fat off my slab of spare ribs and added some of my favorite rub. 

 photo DSC02651.jpg

I setup the kettle with one charcoal basket, a couple of fire bricks, and then placed my glass pan of beans on the charcoal grate. I wasn’t sure if this small amount of fire would work in this lousy cold weather and it turned out that it did just barely work. I wanted to run in a range of 275-300 and all it would do is about 225- 250 degrees with this setup and this lower temp adds one more hour to my cook.

 photo DSC02652.jpg

Added my optional hinged cooking grate and the ribs and got my cook started. 

 photo DSC02653.jpg

I cooked the ribs about 3-1/2 hours and then took them off to foil them with some sweet goodies. 

 photo DSC02654.jpg

The foiled ribs went back on the cooker along with some potato wedges that were oiled, buttered, herbed, salted and peppered. 

 photo DSC02656.jpg

Potatoes didn’t take very long and sure smelled good coming off of the cooker.

 photo DSC02658.jpg

Next step was to remove the ribs and also the pit beans from the cooker. I then unwrapped the ribs and placed them back on the kettle for the glaze. 

 photo DSC02657.jpg

I glazed the ribs a couple of times and pulled them.

 photo DSC02659.jpg

Picture shows them darker than they were.

 photo DSC02661.jpg

 photo DSC02662.jpg

The meal came out great and I did learn a few things about this little kettle. I will add more fire for my next cook in the colder weather. I also used a little too much hickory for smoke and will lighten up on the next cook. This little tailgater still does a great job with some of my smaller cooking chores.

Friday, May 23, 2014

Cooks a pair

This first cook was done on my Char-Broil CB-500X and is my favorite small charcoal tailgate type of grill. It was setup on the left side indirect with a double layer of cooking grids and the right side with straight direct cooking on a single grid. The fuel was a chimney full of that great Ozark Oak lump charcoal and a couple of chunks of hickory for my smoke.  

 photo DSC02045.jpg

 photo DSC02046.jpg

The cook consisted of 4 nice big pork steaks, 4 of my homemade 60/40 white burgers, 8 regular 72/28 burgers, 4 of my homemade Texas hot links, and a plate of hot peppers. 

 photo DSC02048.jpg

I started the pork steaks first on the indirect side of my 2 layer grill since they will take the longest and then added my peppers to the direct side so I can eat some of them during the cook.
I then grilled the balance of the cook on the direct side of the cooker.


 photo DSC02055.jpg

Later in the cook, I glazed my pork steaks with a blend of sauce and some real maple syrup.

The results of my cook.


 photo DSC02049.jpg

 photo DSC02050.jpg

 photo DSC02053.jpg

 photo DSC02051.jpg

 photo DSC02052.jpg

 photo DSC02056.jpg

The cook came out great.
                                               -----------------------------------------
This second cook was done on my GMG Daniel Boone pellet cooker burning hickory pellets. I added my second raised grid for this cook.


 photo DSC02136.jpg

This cook consisted of 3 slabs of loin back ribs over a pan of Rick Salmon’s Pit Beans.
I like to put meat over the beans so the drippings will go into the mix for additional flavor.

The bean recipe is killer!!


Friday, April 23, 2010

Flat Iron Steak Meal / Weber Performer

Around the first of the year, Lowe's Hardware chain put a few Weber Peformers on sale for about half price at $199.00 dollars and I did find one at this great price and bought it. I really wanted a red one but I had to settle for the black.


For my first cook, I wanted to do a total meal on the kettle so here it is.

My menu was to be the following:

Flat Iron Steak
Thick slabbed potatoes
Marinated and grilled veggies
Fruit
An Italian Flatbread

Prep


For my bread, I kinda crossed one my focaccia recipes with my bruschetta flat bread recipe and just made up the dough with some Italian herbs and then added some olive oil, a bruschetta tomato topping, some tomato slices, and shreadded mozzarela cheese. I also sprinkled on some dried Italian herbs.


The bread ready to go on the cooker.


I made up a sweet marinade for my veggies and also added some pineapple to the mix and got it soaking. I had slab onions, bell peppers, and pineapple in the bowl.


I then prepped my slab potatoes. I used peanut oil as a sticker, and then added some dried Italian spices, fresh cracked black pepper, sea salt, and some parmesan cheese.


I sprinkled on some garlic salt and then cracked up some fresh tellicherry pepper on top of my 3 pound flat iron steak.

The Cook


My slab potatoes will take the longest so they went on the cooker first. I then put the bread on the cooker on a raised grid to get it closer to the top of the cooker for the best baking results. I was running the temp at about 400 degrees.


This was the first cook on a brand new Weber Performer Grill.


The bread just off of the cooker. Man, did it smell good!!


Just as soon as I got the bread off, I opened up the vents to get the cooker up to as high temp as possible for the steak.


It only took a few minutes a side to get the steak to about medium rare- medium and then off the cooker and wrapped in foil and rested for about 30 minutes.


The potatoes were done at this time as well.


The veggies went on next in my veggie pan.


At this high temp, they only took a few minutes to cook.


After the steak rested, I cut if for the serving plate. Looked great!


Mommy wanted some more fruit with the meal so she added some tangerine slices to the plate.

Ya just gotta love those Weber kettles...

Tuesday, June 23, 2009

Pizza and Calzones on a Weber Kettle

Been a long time folks as I have been busy with some contest cooking and other Summer time duties. I must do better in the future with the blog!!

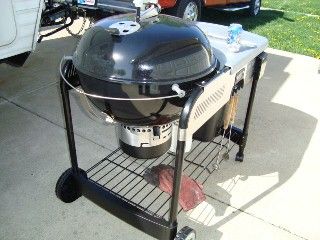
Did you know that you can bake many great treats on the old reliable Weber Kettle?


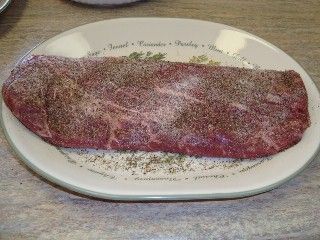
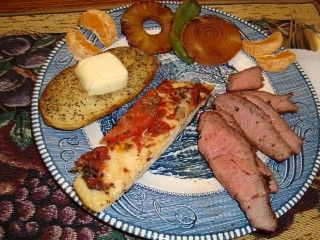
This crispy crust pizza is loaded up with some hot sausage mixed with burger, onions, bell peppers, smoked red peppers, pepperoni, cheese, and sauce. The calzone is made with the same meat and peppers, onions, sauce, herbs, and cheese.

To get started, I like to use a real stone hearth for my baking but it can be done with a different technique and I will cover that at the end of the article for the folks that don't have a stone hearth and want to consider pan baking. Both will work great on the kettle.


I set the charcoal up so it is in a circle slightly smaller than my pizza stone for this indirect bake. I always use lump charcoal for all my baking in any of my cookers/smokers. I have the charcoal containers filled about half full for this bake.


I started a small amount of lump in my charcoal chimney and when it was ashed over and ready, I poured it over the lump in my kettle.


I then added my ceramic plate setter and my 14" in diameter hearth stone. Plate setters can be found at any ceramic, clay, or kiln store. Put the lid on the cooker and waited until it got up to baking temp.


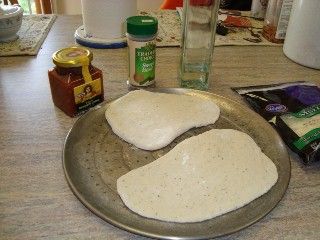
While my hearth was getting all heated up and ready, I started making up the first pizza. This picture shows the sauce, meat, and onions on the pizza.


Finished pizza ready to be carried out and placed on the kettle.


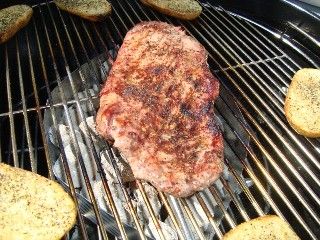
First pizza on the kettle running at about 405 degrees measured at the top of the hearth stone. Take about 18-20 minutes at this temp.


The old reliable Weber kettle doing its thing.


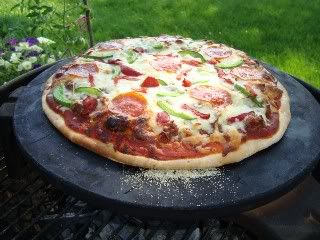
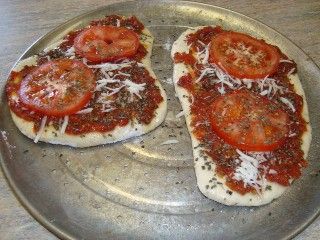
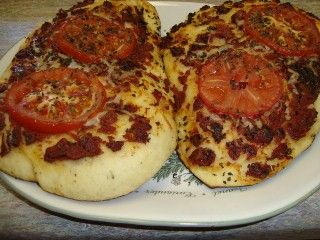
The pizza done and ready to come off the cooker.


While the first pizza baked, I got the second pizza ready for the cooker. I then placed this pizza on my hearth.


I think this one looked better than the first pizza.

While the second pizza was baking, I started on the calzones.


I rolled out the remaining dough and had enough for about 3 medium sized calzones left and I made up the first one.


By this time, the second pizza was ready to come off the cooker.


I then loaded the hearth with all three calzones and placed the cover back on the kettle. I made the calzones with a very thin crust and running at about 405 degrees will take about 12-14 minutes to bake.


Calzones done and ready to come off the kettle.


The results of this short baking session on the Weber kettle.


That is some good looking grub in my book.

Now, for the folks that don't have any method of making up a hearth.

The first thing you need is a way to make the cook indirect so about any type of pan will do as long as it is about as large as the pan you will use for your baking.


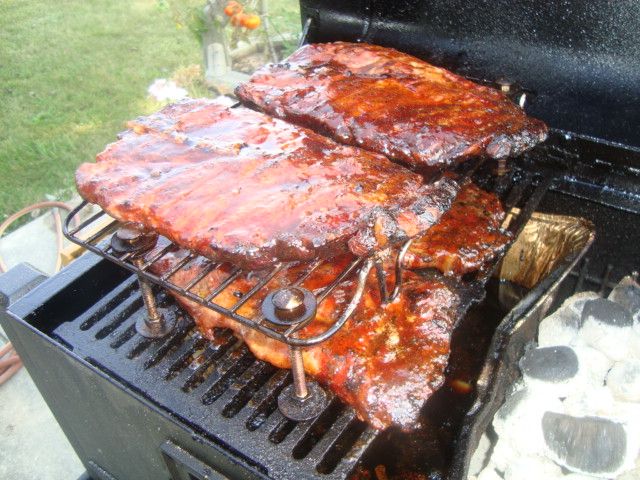
This is a standard sized cookie sheet that I have placed under my raised grid. You do need to get the baking grid as high up into the dome as you can for the best results. This baking grid has some bolts to raise it up to where it is needed.


This picture shows a pan on top of the setup and that is where your pizza needs to be cooked. Pan pizza is great on this cooker.


You know, it is really not rocket science and if nothing else, use a few beer cans to elevate a baking grid in the Weber kettle. Make do with whatcha got!