Showing posts with label Green Mountain Pizza Oven. Show all posts

Wednesday, February 28, 2018

Green Mountain Pizza Oven / Details & Dimensions

I had a ton of feedback on this Green Mountain accessory  as many folks wanted to know if it could be made or modified to fit other pellet grills. Well, here are the details. Use these dimensions at your own risk!

 photo IMG_1124.jpg

These are the rough overall dimensions of the pizza oven.

18-5/8”  total width of the unit
13-1/4”  depth of the unit measured on the dome lid  (doesn’t include some of the mounting tabs
11”  total height of the unit

The pizza oven is basically just 3 pieces which consists of:

The Dome Cover with the bolted on handle and is 6” high less the handle
The hearth stone which measures 16” wide by 14” deep

The pyramid base unit which just sits inside the Green Mountain Grill. While it is all one piece and welded together, it is made up of the pyramid part, the diffuser plate which the hearth stone sits on, and several tabs which hold the cooker at the right height in the grill and also the proper position. There are also tabs that hold the dome cover in the correct position. 

 photo IMG_1148.jpg

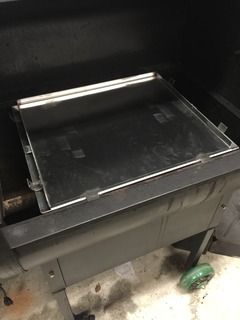
This is what it look like out of the cooker. The hearth stone is placed on top of the diffuser plate which has a small rail around the 3 sides. This plate can not be removed to do any direct cooking. Look closely and you can see two of the tabs that hold this unit in the cooker.

 photo IMG_1149.jpg

This is the left side of the pyramid part and you can see the rolled tabs that hold and position the dome cover. You will also see a gap between the lower pyramid part and the welded on diffuser plate and that gap is where the fire hot convection air comes up and is directed by the dome cover to the top of the pizza. This gap is on both sides of the unit. 

 photo IMG_1150.jpg

This picture shows the mounting tabs on the back side of the unit. 

Ok, this is how it measures:

19-1/4” is the width including the dome tabs
15-1/4” plus 1” for the tabs that hold it deep
6-1/4” is the height measured to the tabs that hold the unit inside the cooker. Measured to the very top of the unit would add an additional 3/4” to include the diffuser rails. 

 photo IMG_1144.jpg

The hole in the bottom of the pyramid measures 5-5/16” square and that goes over the fire box. 

 photo IMG_1147.jpg

Front of cooker

 photo IMG_1146.jpg

Back of cooker


You can see the mounting tabs on these photos. 
Green Mountain High Temp Pizza Oven Accessory

I purchased this Green Mountain wood fired pizza oven a few weeks ago when they were on sale and finally got it installed in my Daniel Boone to try it out. WOW, it is one great accessory. Pizza as high as 850-875 degrees is what it is designed to do. Imagine, a 2 minute pizza!

 photo IMG_1124.jpg

This accessory is all Stainless steel except for the hearth stone and it sure looks like a quality unit. To install it, I just took the grids and drip pans out of the cooker and just dropped it into the Daniel Boone. The unit fits over the fire box in the cooker so all the heat is directed up into the unit. 

 photo IMG_1125.jpg

The base of the unit installed in the cooker. 

 photo IMG_1127.jpg

Ready to go in the cooker. The top part just lifts up and off of the unit if needed (for rookies that can’t handle a pizza peel) but I found that it wasn’t needed for my pizzas. I had plenty of room for using both a wood and metal peel.

 photo IMG_1126.jpg

I wanted to start with a couple of simple Pizza Margherita style pies so I didn’t have very much on them for my first attempt. 

I used some frozen dough I had made up a few weeks ago that was made with 00 flour, a few herbs, and of course, salt, sugar, oil, water, and some yeast. To top the pizza, I started with some sauce, and then some mozzarella cheese, next up some small sliced tomatoes, and then some shredded parmesan cheese. I did the second pizza the same way but also added a few pieces of pepperoni. 

 photo IMG_1130.jpg

Since this was my first bake on this unit, I decided to use a little lower temperature at around 650-700 degrees for my first attempt. To get this temp, I had to set the cooker at just 275 degrees. It took about 20 minutes to get to temp on this cold 20 degree morning. 

 photo IMG_1133.jpg

Pizza just loaded into the hot oven.

 photo IMG_1134.jpg

Pizza about done in the oven...note the bubbled up dough. After loading, I let it bake for 2 minutes and turned it about 90  degrees and let it go for 2 more minutes for a total of 4 minutes to complete the pizza. The 90 degree turn is all that is needed as the pizza oven heats the top of the pizza from both sides of the accessory. 

 photo IMG_1135.jpg

 photo IMG_1137.jpg

 photo IMG_1139.jpg

 photo IMG_1140.jpg

I thought my first effort came out great...love that bubbled up dough and the way everything came out. I added my chopped basil after the pizza was out of the oven. I can hardly wait to try it again at a higher temperature. 

 photo IMG_1141.jpg

 photo IMG_1142.jpg

Lunch...


And I paid just over $100 dollars for this unit and I think it is a great value for the folks that own a Green Mountain grill. The grill will fit both the Green Mountain Daniel Boone and the Jim Bowie. Won't fit the Davy Crockett grill.