Showing posts with label Hasty-Bake Ranger. Show all posts

Wednesday, February 28, 2018

Ham, Sides, & Rolls in the Hasty-Bake Ranger Rotisserie

This is my second cook in my Hasty-Bake Ranger using my homebuilt rotisserie setup and it came out well. 

 photo IMG_1160.jpg

 photo IMG_1161.jpg

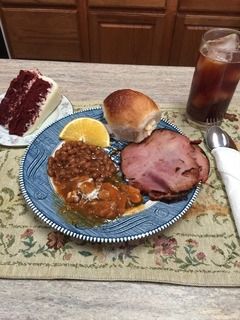
The ham, the candied yams, the baked beans, and the yeast rolls were all done on my Hasty-Bake Ranger. Sure made a fine lunch.

I cooked a Hickory Smoked Cumberland Gap ham that weighed a little under 8 pounds in the rotisserie using a good hardwood lump and some hickory chunks for smoke. I guess that would be called a double smoked ham. 

 photo IMG_1152.jpg

I did this cook early yesterday morning with a temperature around 39 degrees and in a light misting rain. That Ranger is one of two tailgater sized cookers that Hasty-Bake makes and is a nice all Stainless Steel cooker / smoker.  

 photo IMG_1155.jpg

I glazed the ham a couple of times with a Honey Sriracha Glaze and the ham took about  2 hours and 45 minutes to get done in the rotisserie. I was using s cooking temperature of about 275-320 degrees. 

 photo IMG_1157.jpg

After I pulled the ham off of the cooker, I changed it back over for regular cooking and added my pan of candied sweet potatoes, a pan of baked beans, and a pan of yeast rolls to complete my meal. 

 photo IMG_1158.jpg

Sides just off of the cooker.

 photo IMG_1159.jpg


I ran the ham thru my slicer and it came out nice and ready to be served.

Sunday, September 17, 2017

Turkey Breast on my Hasty-Bake Ranger Rotisserie

This was just my second cook on my new Hasty-Bake Ranger which is one of their two tailgate size cookers. The Ranger is the nicer of the two models and is all Stainless Steel and is one of the reasons that makes it a great little cooker / grill. 

 photo IMG_0860.jpg

Ok, I didn’t figure that there was any good way to install a rotisserie in this little cooker as there were handles on both sides, the charcoal door on the right side, and the exhaust vent on the left side which all were in the way of any type of good method of installing the rotisserie unit. I had about given up on this project and was cutting up a stainless steel rack to go in my charcoal pan to help prevent the small pieces of lump from falling thru and it “hit me up the side of the head”, why couldn’t a fellow install a rotisserie from front to back in the cooker? I measured it all up and by golly, I think I could do it! 

 photo IMG_0861.jpg

Had to order a couple of items but I got it all setup and then cut down a new rack or cooking grid to fit on the remaining space on the cooker and was ready to try it out. I needed the grid to be able to both use the rotisserie and the grid at the same time. Really made a nice modification to this grill. 

 photo IMG_0866.jpg

Beautiful cool morning for the cook and I got it started early in the morning. 

 photo IMG_0869.jpg

The turkey just before it came off of the rotisserie and it came out a little darker than I expected so I will need to lower the temperature a little on the next cook but overall, I was well pleased with this part of the cook. The skin was perfect! 

 photo IMG_0870.jpg

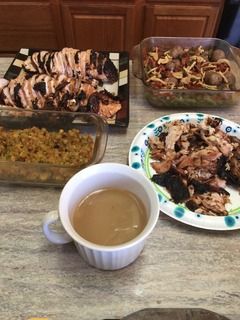
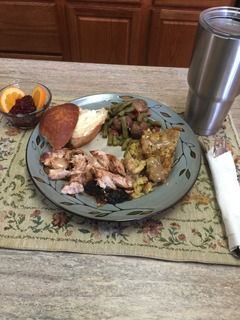
Pulled the turkey breast and the rotisserie setup and put the cooker back together and then added my raised second grate and put my sides on the cooker. I had a pan of new potatoes with green beans, onions, and bacon, a pan of cornbread stuffing, a bowl of gravy, and on my raised grate, a pan of yeast rolls. 

 photo IMG_0872.jpg

Didn’t take very long to get the sides done as they just needed heated up to a safe temperature. 

 photo IMG_0873.jpg

 photo IMG_0874.jpg

 photo IMG_0875.jpg

The results of my cook. 

 photo IMG_0876.jpg

 photo IMG_0877.jpg

 photo IMG_0878.jpg

It all came out great and the rotisserie mod worked out well. 


I think I know where my Thanksgiving meal will be cooked this year.

Sunday, April 16, 2017

Hasty-Bake Ranger Mini Review and 1st Cook

I have finely got around to setting up my new Hasty Bake Ranger 380SS to suit me and then doing my first cook on it.

 photo IMG_0363.jpg

I have it sitting on one of my service carts to make it much easier to use.

 photo IMG_0364.jpg

Built a Stainless Steel second cooking grate for the cooker. 

 photo IMG_0366.jpg

I also found a nice cover to fit this setup.

 photo IMG_0362.jpg

Next step was to cut a firebrick in half and then adding one whole firebrick to make my divider in the firebox for my fuse burns which is the method I use for my longer cooks in my Hasty-Bake cookers. 

I figured my first cook could probably take up to 5-6 hours so I loaded the charcoal pan about 80% full of the Stubb’s charcoal and added a few hickory chunks for smoke.

My first cook was to be a Slab of Ribs cooked over a half pan of BBQ  Pit Beans so the drippings would go into the pan to give the beans some additional flavor, and a pan of Au Gratin Potatoes. Wife made up a Wilted Baby Spinach Salad to go with this meal. 

 photo IMG_0367.jpg

 photo IMG_0368.jpg

Made up the pan of Au Gratin potatoes the evening before the cook and then did the same for my BBQ Pit Beans and put both into the fridge. 

 photo IMG_0369.jpg

Started my fuse burn the next morning just before daylight and it took about 45 minutes to get the cooker warmed up and on temperature for my cook.

 photo IMG_0370.jpg

While the cooker was coming up to temp, I prepped the ribs and then cut the slab into two pieces so they would fit over my pan of beans. At this time, I also added my brown sugar to the top of my bean pan. When the ribs reached the sweat stage, I started my cook. 

 photo IMG_0371.jpg

The fire in the charcoal pan just before I loaded the cooker...cooker temp was at 180 degrees and climbing slowly. 

 photo IMG_0372.jpg

This is about an hour into the cook and after I got the cooker vents adjusted for a nice steady burn.

 photo IMG_0373.jpg

The first item done were the potatoes.

 photo IMG_0374.jpg

Ribs were wrapped with some goodies about 2-3/4 hour into the cook.

 photo IMG_0375.jpg

The beans were the next item to get done and I hadn’t stirred in all the drippings and smoke skum when this picture was taken. 

 photo IMG_0376.jpg

The ribs were unwrapped and then glazed and this is my results for this treat. 

 photo IMG_0377.jpg

Ribs cut for serving. 

 photo IMG_0379.jpg

Wife’s Wilted Baby Spinach Salad to be served with this meal. 

 photo IMG_0380.jpg

 photo IMG_0382.jpg

Everything came out great and it sure was a wonderful lunch.

And for the Hasty-Bakers that are following my progress with this new Ranger and my method with the fuse burn to operate it, here is some additional information.

This cook took about 4-1/2 hours which is quicker than I expected and only used the first row or half of the loaded charcoal. This would calculate out to about 8-9 hours total cooking time with my 80% full load of charcoal if I would have needed it. And I think with a full load of charcoal, a fellow could get up to 10-11 hours total cooking time with this method. 

Cooker control was about what I expected and about the same as it is with my larger Hasty-Bakes. My planned cooking range for this cook was about 220-275 degrees measured on the surface of the cooking grid and I had both the intake and exhaust vents all the way open at the start of the cook. I shut the intake vent down to about half open about 1-1/2 hours into the cook. After the 2-1/2 hour mark, I closed the intake vent all the way. The last vent setting I had to make was to close the exhaust vent down to about half open and this just locked in the temperature to where I wanted it and I think it would have run for several more hours if I would have needed it. It’s almost a “set and forget” method of cooking on this smaller Hasty Bake Ranger (tailgater size) cooker. 

The food was great, the cooker operation was great, and I am very satisfied with my new cooker. 

Update: There is not as much room between the firebox and the ash pan so I had to cut down my normal 4" clearance to 2" between the firebox and the ash pan for this fuse burn. Worked fine at this distance.