Showing posts with label Jerky. Show all posts

Wednesday, February 28, 2018

Jerky in the Green Mountain Pellet Cooker / Bull Racks

Did this jerky a couple of days ago on a cold morning (22 degrees) in my Daniel Boone pellet cooker using a blend of hardwood Premium heating pellets. The same pellets I have used for the past 15 years for everything I cook in my pellet grills. 

 photo IMG_1114.jpg

This round of jerky was made from a little over 5 pounds of top round which I found on sale last week. I had the meat cutter at the store cut the meat into slices a 1/4” thick and against the grain. For my preparation, I cut every speck of fat I could out of each slice of meat and then cut the pieces into strips about 1 to 1-1/2” wide. 

 photo IMG_1115.jpg

To be sure I got each piece covered well with my marinade, I used the two bowl method to be sure each piece was dipped into the marinade and covered completely.

 photo IMG_1116.jpg]

My favorite marinade for jerky and I use if for most batches is the following. This recipe is for about 4 pounds of meat. 

1 cup soy sauce
1 cup brown sugar
1/3 cup blackstrap molasses
2 tsp onion powder
2 tsp garlic powder
2 tsp fresh ground black pepper
1 tsp white pepper
1 tsp cayenne pepper*
2 TBL crushed red pepper flakes*

*I am sure this recipe will be too hot for most folks so do cut back on the hot pepper to suit your taste.

I will sometimes add about a 1/4 cup of Teriyaki sauce to this recipe for one of my Daughters and her family as they like that recipe better. 

I like to have the meat in the marinade for at least 24 hours before the fire and do make it up a few hours before you need it to allow enough time for the sugar to dissolve and the spices to kinda mellow out in the bowl with some stirring once in a while. 

 photo IMG_1118.jpg

I used my “Bull Rack BR6 Ultimate which is The Worlds Best BBQ Rack” as that is what it says on the box. I only needed 4 of the 7 pans that will fit in the rack for this cook. 

 photo IMG_1119.jpg

This picture shows the jerky about 3 hours into my 4 hour cook running 150 degrees in the cooker. 

Now, I have to throw in a couple of plugs for the Green Mountain cookers and the first one is the height inside the cooker is tall enough for many different applications including this very nice tall rack system. I also run rotisseries including the Rib-O-Lator which requires a lot of height. 

Another nice feature is the PID digital controller which will operate between 150 degrees to a top of 500 degrees. The lower temperature of 150 degrees is perfect for items like jerky, sausage, vegetables including my hot peppers, and other drying or low temp smoking with that light hint of wood smoke flavor which makes the items better tasting in most treats. 

 photo IMG_1120.jpg


Came out great and will be in the mail in time for Christmas.

Friday, November 17, 2017

Ground Sirloin Jerky on the Green Mountain Daniel Boone

I did this jerky cook early yesterday morning and it came out quite well. It was also my first try making jerky out of ground meat. 

 photo IMG_1091.jpg

I did 5 pounds of the ground sirloin (90%) lean for this batch. It took 3-2/3rd trays on the BR6 Ultimate Six Rack setup from Earthworks.

I had 3 trays of the standard mix and cure that came with the LEM Jerky Cannon and one tray of which I added a big sprinkle of cayenne pepper.

 photo IMG_1088.jpg

I turned and rotated the trays every hour and the total cooking time was 3 hr and 45 minutes.

 photo IMG_1083.jpg

My LEM Jerky Cannon worked great for this treat and made quick work out of 5 pounds of ground sirloin. 

 photo IMG_1084.jpg

Ready to be carried out and placed on my Green Mountain Daniel Boone cooker. I ran the cooker at 170 degrees through out the whole cook.

 photo IMG_1086.jpg

About done on cooker.

 photo IMG_1089.jpg

Jerky done and cooling on the counter top. 

 photo IMG_1090.jpg

The wife liked this batch and I think it is pretty good but I think it could be improved with more spice and heat. 


Next batch will be made out of sliced top round.

Saturday, April 6, 2013

Hot Smoked Beef Strips/Jerky

I am sitting here at about 3:00am in the morning writing up this cook and waiting for what I hope is our “Last Winter Blast”. In the next 24 hours, we are expecting 6-10 inches of fresh snow along with some 30mph wind gusts!

Anyway, I did a couple of cooks yesterday just ahead of the blizzard and will share this one with the folks on the forum.

I call this one “Hot Smoked Beef Strips” and they are somewhat like jerky but are not cured so there is some special care after they are cooked. In my opinion, they are so much better than regular jerky but the meat does need to either frozen or refrigerated after they come off the smoker. 

 photo DSC01563.jpg

I started with a small bottom round roast that weighed just over 3 pounds and had the meat cutter at the Kroger store cut it 1/4” thick against the grain for my meat strips. 

 photo DSC01562.jpg

This is the recipe used for my marinade.

1 cup soy sauce
1cup brown sugar
1/3 cup blackstrap molasses
2 tsp onion powder
2 tsp garlic powder
2 tsp fresh ground black pepper
1 tsp white pepper
1 tsp red pepper
2 TBL crushed red pepper flakes

This recipe may be toooo hot for some folks so you may need to cut back on the pepper flakes. 


 photo DSC01564.jpg

Next step is to cut as much fat as possible out of the meat and then cut the pieces into your jerky sized pieces. 

 photo DSC01565.jpg

 photo DSC01566.jpg

It goes into the marinade and then into the fridge for about 24 hours. Need to stir it up about every 6 hours to be sure all pieces get covered well. 

 photo DSC01567.jpg

On smoking day, it comes out of the marinade and placed on some paper towels to get rid of the excess marinade. 

 photo DSC01568.jpg

I fired up the Green Mountain pellet cooker and set the temp at the lowest it will run and that is 150 degrees and loaded the pieces of meat. Was a cool morning with the temp at about 34 degrees. I was burning hickory pellets. 

 photo DSC01574.jpg

It took about 4-1/2 hours to get the meat cooked to where I wanted it and looked good coming off the grill.

Again, this is not jerky and has not been cured so it must be refrigerated or frozen.

This is one great treat!

Saturday, December 5, 2009

Holiday Appetizers / Jerky

With the holiday season coming up, we always like to have some homemade appetizers, treats, and snacks available for family and visitors. We usually make up some holiday baskets for several friends as well.


This is one of our baskets from last year and it contains a package of my Pig Candy, a package of my Regular Jerky, and a package of my Hot and Spicy Jerky, a couple of logs of my real Smoked Cheese, and a bottle of Jack.

Now, dontcha wish you were one of my friends and received your Christmas basket???

CAUTION: This jerky recipe and method doesn't have a cure in it so it must be either refridgerated or frozen so it doesn't spoil after the cooking and drying.


This batch was 10 pounds of beef bottom round roast and I had the store cut it off of the full round in 1/4" thick slices for my jerky. This saves me a step in the prep of this treat.


I usually start by making up my marinade for the meat as it needs to soak a while so the sugar can dissolve. For this 10 pounds of meat, I mixed up this recipe...

3-1/2 Cups of Soy Sauce
3/4 Cup Dark Molasses
2-1/4 Cup Brown Sugar
2 TBL Onion Powder
2 TBL Garlic Powder
2 TBL Black Pepper
1 TBL White Pepper
1 TBL Ground Red Pepper
2 TBL Crushed Red Pepper


I make the marinade up in a large bowl and then throw the meat into the bowl as we trim it.


We trim as much fat out of the meat as we can and then cut it into slices like you see in the picture.


After the meat is trimmed, I place the meat and the marinade into a large stainless steel pot and put it into the fridge for at least 12 hours before it goes on the smoker. More time is even better.

On smoking day, I usually bring my cooking grids into the kitchen and then load them up. This was a large cook and will take both of my Backwoods Party cookers as I ended up with 14 grids of jerky meat.

I loaded up both cookers with some Rancher charcoal and then placed some hickory chunks over the top. I am running both with a dry water pan with my foil pan modifications as I sure don't need any moisture for this type of cook. After I lit them up, I cut the air back to about nothing on the intake vents as I don't want the temps to go over about 160 degrees.


The meat then comes out of the fridge and we load it on the cooking racks. With the Backwoods cookers, I can only load the racks about 65% full so the cooker can flow the proper amount of smoke and heat.


I ended up with 14 racks of jerky ready to go into the cookers.


Meat looked great coming out of the marinade.


Was a cold morning at about 18 degrees and I got the meat on the cookers at about daylight.

On my one cooker, I did my spicy hot jerky and for this, I sprinkled on some more ground cayenne pepper as I put the grids into the cooker.


It did warm up a little to I think about 28 degrees so it was a good day for my cook.

I had one cooker that did great and I was able to keep the temps where I wanted them at under about 160 degrees but the other cooker got a little hot and the meat got done a little quicker that I expected at about 4 hours. Didn't hurt the quality at all as the meat from both cookers came out wonderful. I need to adjust the door on that cooker and I am sure my next low temp cook will be fine.


My jerky started coming off the cookers at about 4 hours and continued to come off for another 4 hours before all of it was done.


Meat looks great and is now ready for the vacuume pack bags.


These are the first few bags off the cookers and are ready for the freezer.

Again, one last CAUTION, this meat must be refridgerated or frozen and it hasn't been cured. You can't just leave it set out on a table as it will spoil.

This is one great treat and will be a great snack for the holidays.

My smoked cheese is coming up next...

Friday, January 9, 2009

Jerky on a Smoker/Cooker

Jerky is a great treat that MUST be cured and then dehydrated on the proper equipment to be safe as a meat that can be left out in the open air and at room temp for days. Most of what you read about on the forums about this great treat shouldn't be called jerky but "Cooked Meat Strips" as unless it has been cured, it needs to be refridgerated or frozen to be safe for eating.

For this article, I will call my product "Jerky" as most folks won't know anything about this process if I use the term, cooked meat strips. Most all dehydrated products (Real Jerky) use very little heat and never over a temp of about 140 degrees to cure and process the meat.

My recipe and process will require a cooker/smoker that is fairly air tight so that it is possible to run the lower temps that are required for this meat. I would recommend a temp of about 140 grid to no higher than about 170 grid temp for the best results. I have used ceramic cookers, Backwoods cookers, and WSM's for this process with good results.

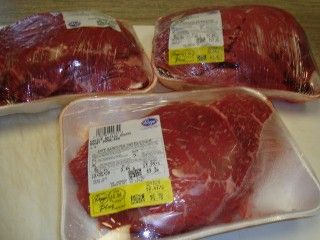
Jerky can be done with about any lean meat including poultry, beef, and some lean cuts of pork and some cuts of wild game. This article will be about beef as I like to use one of the very lean beef products like a bottom or top round roast.


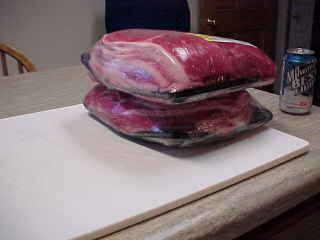
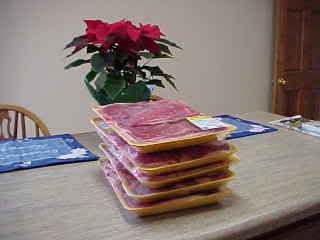
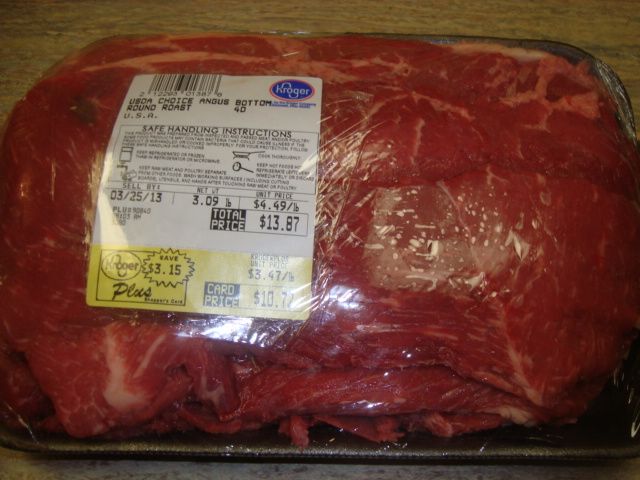
This is 16 pounds of bottom round graded choice and I try to buy it on sale for under $2.00 a pound as this makes great jerky. I have the store cut it 1/4" thick so this saves me a step in the process.


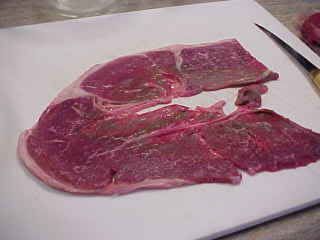
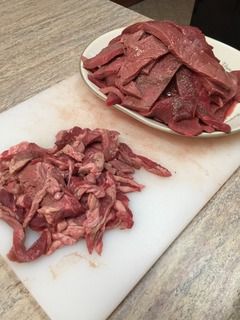
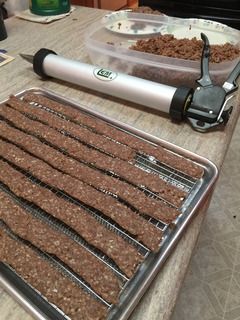
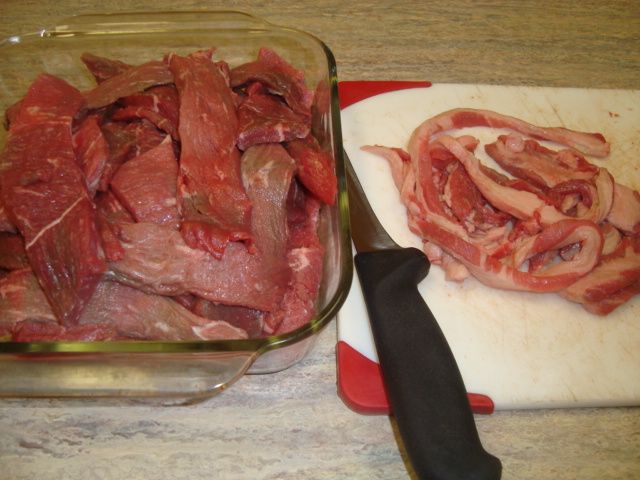
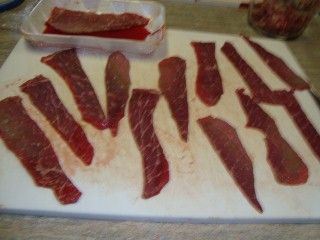
I lay each piece of meat out on my cutting board and very carefully cut EVERY speck of fat out of the meat. Fat is the enemy and will make your finished treat get fuzzy and green very quickly if left out on the counter very long!! I then cut the meat into strips that are about 1-1/2" wide by maybe about 3-4" long.


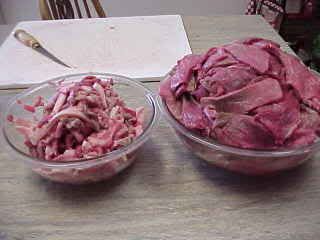
This is what the meat looks like after is has been prepared for jerky. I freeze most all of the scraps on about any meat that I prepare and use it later in one of my sausage recipes.


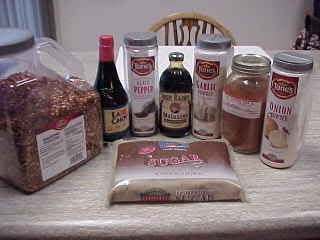
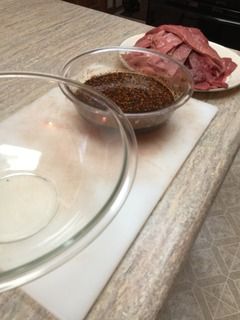
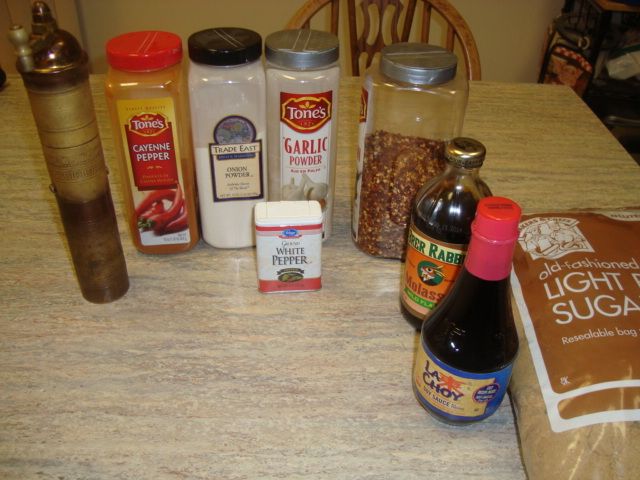
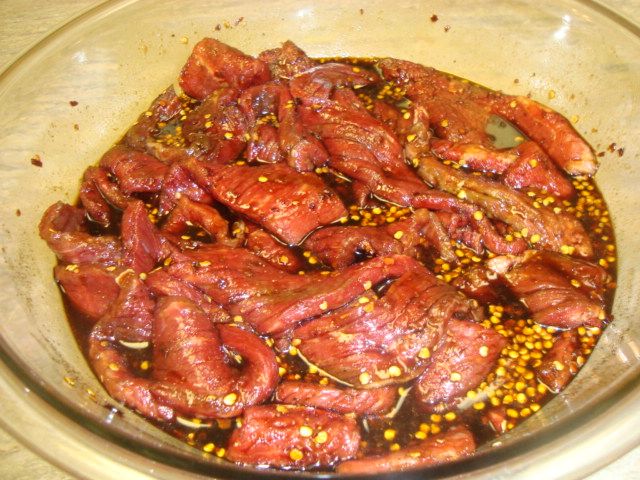
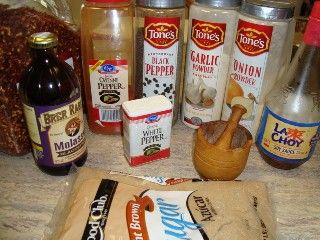
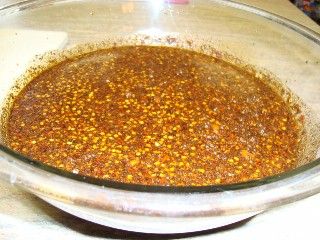
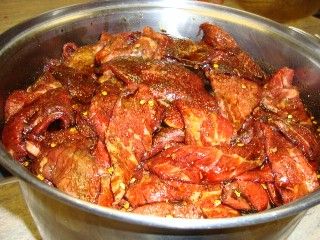
For each four pounds of meat, I used the following recipe for the marinade. I made four batches for this cook.

1 cup soy sauce
1 cup brown sugar
1/3 cup blackstrap molasses
2 tsp onion powder
2 tsp garlic powder
2 tsp fresh ground black pepper
1 tsp white pepper
1 tsp red pepper
2 TBL crushed red pepper flakes

This recipe may be toooo hot for most folks so do cut the heat down if you can't eat spicy jerky.


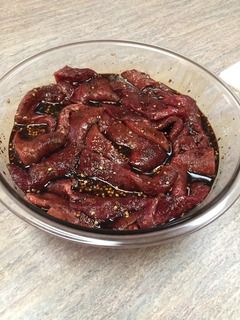
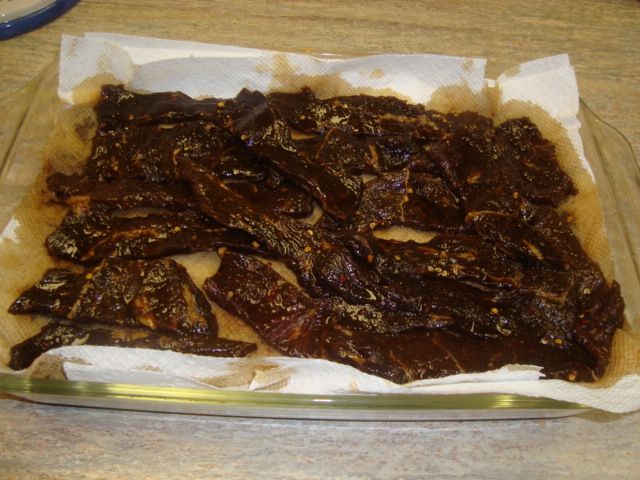
The meat then goes into this marinade and then into the fridge for a day or two.


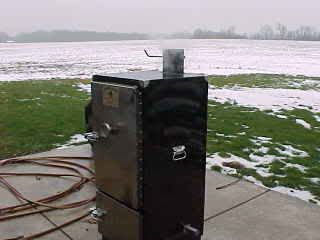
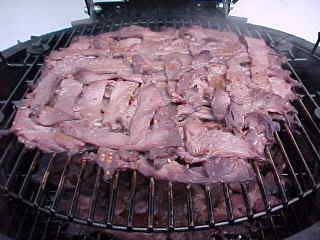
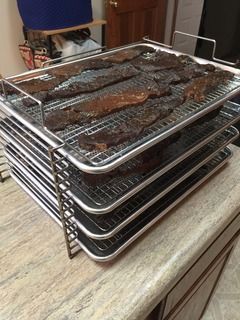
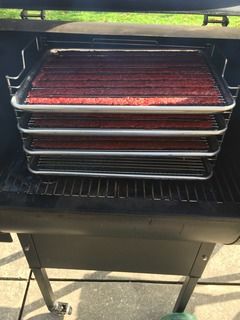
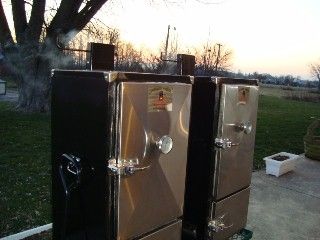
On smoking day, I got my Backwoods Party ready for this very low temp cook. Was kinda a nasty day in Indiana with some misting rain and the temp is at about 35 degrees. The cooker was filled with lump and I added 3 small chunks of cherry wood for some smoke. I was real careful bringing the cooker up to temp as my plan was to cook this jerky at no higher than about 160 degrees. This was my first cook at this low temp on the Backwoods Party and I wasn't sure how the cooker would perform.


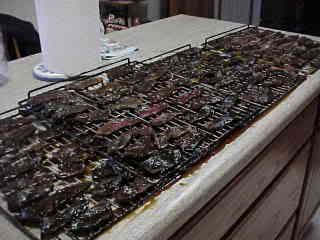
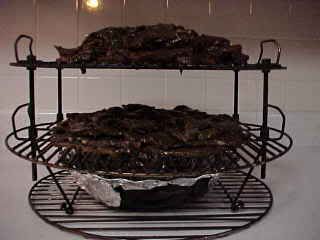
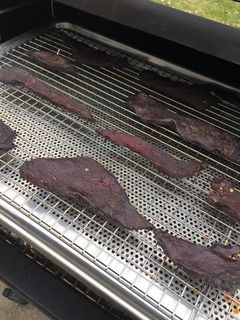
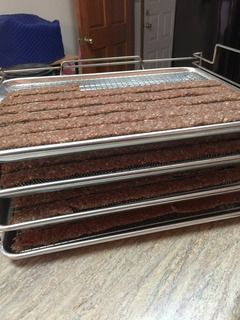
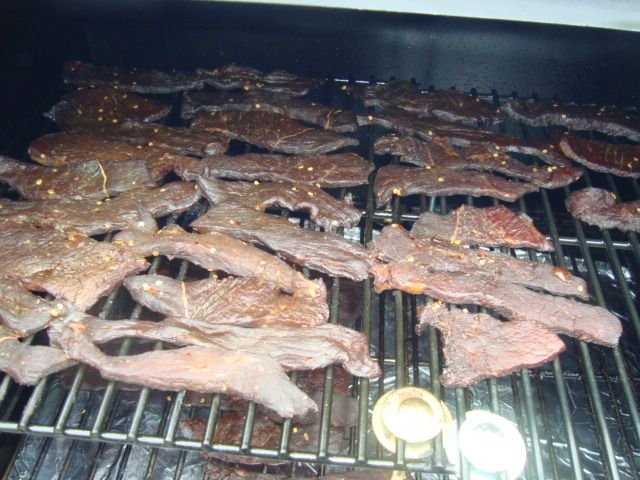
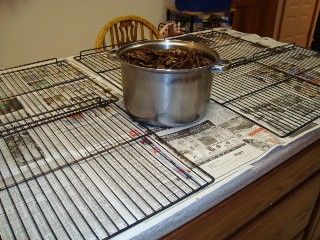
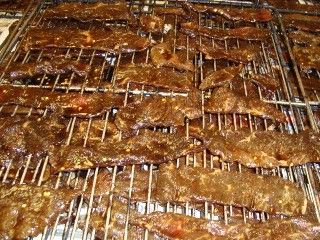
I ended up using 10 grids for this cook. The Party comes with six grids and I also used four grids out of my Chubby. I filled the grids about 65% full of meat as the cooker needs to breathe. I was sure glad that my Party came with the option of extra rails in the cooking chamber.


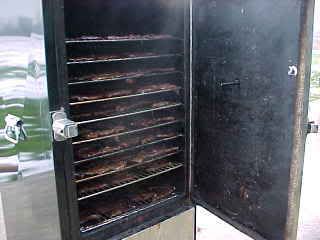
This picture shows the 10 grids of jerky in the cooker. I was running a dry water pan with my foil strips.


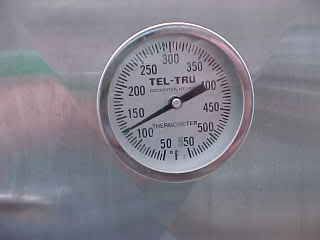
The cooker did a fine job for the first couple of hours and I was able to keep it at about 130 degrees.

I am now about 4 hours into the cook and the Party is "locked" in at about 145 degrees so I would guess that I will start getting meat off the cooker in just a few more hours.

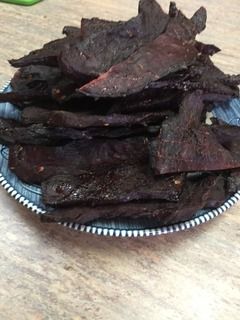
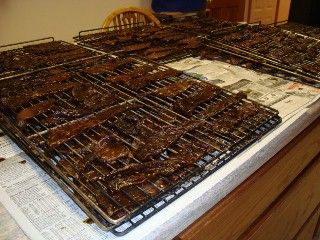
The total smoking time was about 8 hours and later in the cook, the cooker did get up to a high of 170 degreees when I wasn't watching it very close but that was still ok for the jerky.


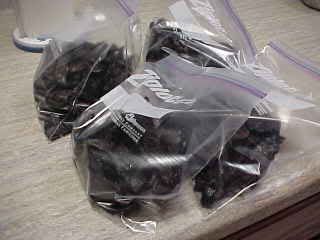
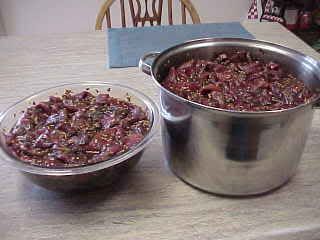
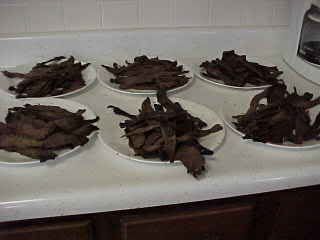
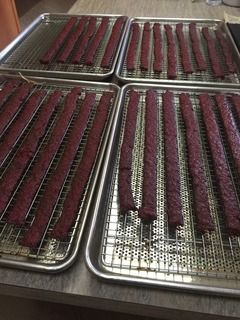
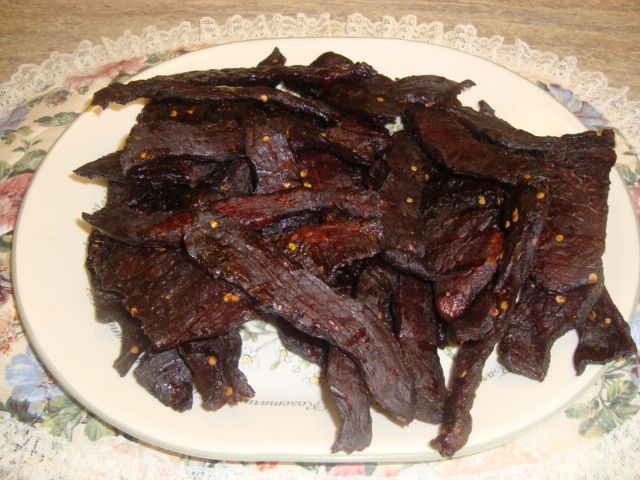
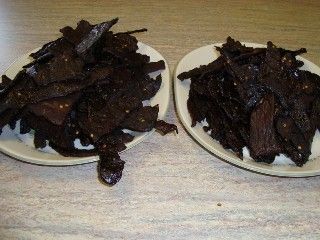
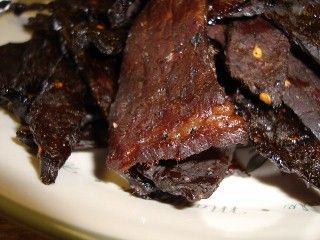
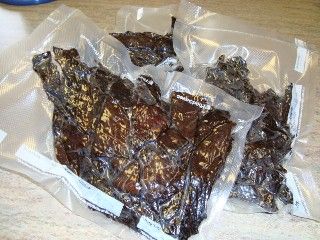
I started with just under 16 pounds of meat and the results were 5-1/2 pounds of finished product. Will repack into 1/2 pound vacumed packed bags in the morning.


My large Egg with my "Contraption" setup is another cooker that can be used for this treat. It is a little more work and does take longer but does produce a great product. I call my process on the smaller ceramic cooker "the stack and pile method".


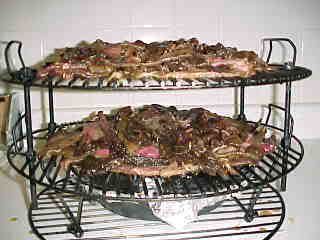
This cook was about 20 pounds of choice top round. I use the same recipe and steps for getting this meat ready for the cooker.


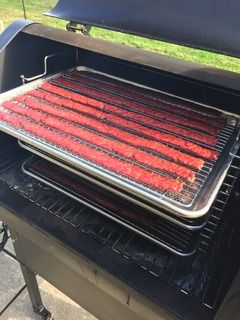
This picture shows my 20 pounds of meat on two layers in my contraption about ready to go on the Big Green Egg.

It is difficult to keep the Egg under about 150-160 degrees required for this meat but can be done if the lid is never opened for more than just a few seconds. This is where my contraption shines as I just pull the whole setup out of the cooker and take it into the kitchen and re-arrange my meat for the next round and then take it out and drop it back into the cooker.


This is what my two layer stack and pile method looks like on the cooker just before I took it into the kitchen for my next service.


During this cook at about every two hours, I pull the contraption with the meat out of the cooker and take it into the kitchen for this service. I re-arrange the meat to where the stuff on the bottom in the pile goes to the top of the next pile, the meat in the middle then goes to the bottom of the pile and last, the meat on the top goes to the middle for my next round. Might sound complicated but with the use of six plates is pretty easy to do.


Here is another picture later into the cook and I think you can see just how much my piles have gone down in size as this cook gets done.


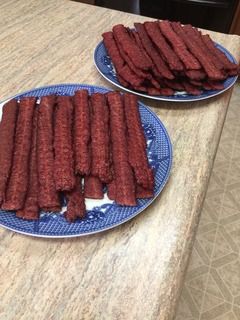
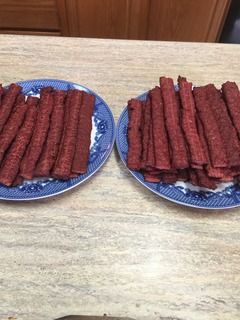
This picture shows my jerky cook about done. As I complete the cook, I usually start getting meat off the cooker in about 8 hours and this will continue until about 12 hours with this process on the Egg.


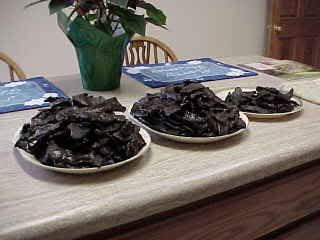
This picture really doesn't do this cook justice as it looks much more darker than it was but might give you some idea of how the meat comes out on the ceramic cooker.


To do this cook in a WSM, I use toothpicks and hang the meat from the top grid. I can only do about 5 pounds at a time but it still comes out great. I have a picture somewhere but can't find it this morning.

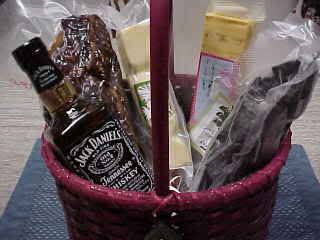
Again, this meat must be refridgerated or frozen after it is done as it hasn't been cured but is still a wonderful treat to snack on and sure is nice in a gift basket.