Showing posts with label Contest Cooking-WSM. Show all posts

Monday, February 16, 2009

WSM / Brinkmann "Charcoal" Pan Modification

This is the first major modification that I came up with for the WSM cooker and I started using this great drop-in water pan modification in about 1998 for my overnight and contest cooking.

The pan is made by Brinkmann and is called a charcoal pan even though it is used for a water pan in their Brinkmann Gormet Water Smoker. The Brinkmann part number is 114-0002-02 and can be ordered from Brinkmann or found at several after market accessories type stores. Just be sure to get the correct "charcoal" pan and it will just drop into the cooker like it was made for it.

The WSM is sure a great little cooker other than the fact that it comes with a real rinky-dink water pan. The standard pan doesn't fit the cooker very well and the capacity isn't enough to allow a cook longer than just a few hours before it needs service. This nice little smoker is capable or running unattended for 10-12 hours on one fill of charcoal if it wasn't for the standard water pan.


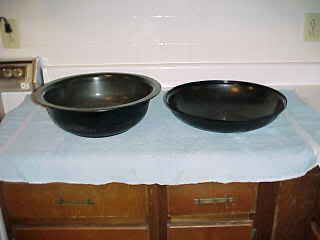
The Brinkmann pan shown on the left in the picture has about double the capacity of the standard Weber pan on the right in the picture. The Brinkmann pan will hold about 2 gallons of water vs the standard Weber pan which holds about one gallon of water.


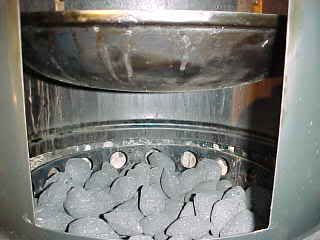
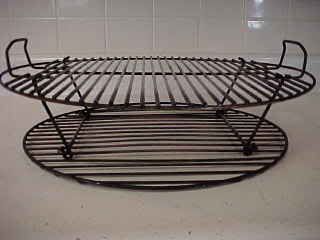
This picture shows the standard WSM water pan in the cooker and you as can see, their is plenty of room for a larger and deeper pan.


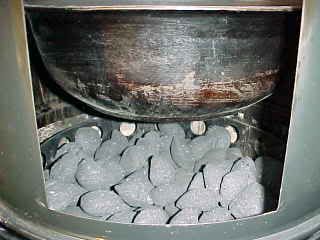
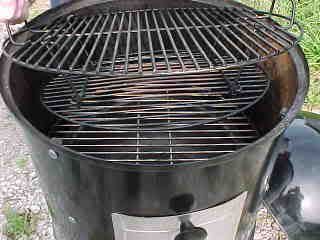
This picture shows the larger Brinkmann charcoal pan in the cooker and it does place the pan closer to the fire but in my 10 years of use, I can find no fault with this location in the cooker.

The larger capacity pan will help control the temperature and prevent spikes in the cooker much better than the standard pan especially in the heat of the Summer. The second advantage is that the cooker with the larger pan will run up to about 9 hours or overnight un-attended which make this modification great for contest cooking.

I just wish I had a dollar for every pan that Brinkmann has sold for this cooker!!

Wednesday, February 11, 2009

WSM Cooker / Increased Capacity

There are several methods of increasing the capacity or adding a third grid in a WSM cooker and I feel that mine is one of the best. My modification will allow the cook to easily service his meat without any problems on this great little cooker.

I like to baste my meat once in a while on the cooker, maybe turn the meat over on the cooking grids, maybe foil the meat, and I also like to glaze my meat near the end of my cook and my setup will allow this without any headaches.


I mount a Grid Extender (a Big Green Egg product) under the top grid in my WSM cooker and this just hangs down in the cooker and is used for my middle grid in my larger cooks. The Grid Extender is a pretty slick device and can be mounted over or under most grids and costs about $24 dollars. This grid mounted under the top grid places this cooking surface right in the middle of the cooker and does have enough room for a couple of extra pork butts.


Cooking with the three grids is fairly easy to do with this modification and I always place a table beside all my cookers which I use to service the cooker and my meat. These are the steps I take to service my meat on all three layers with this setup on the WSM cooker. Pull the lid, grab the handles on the top grid and pull the whole setup including the two layers of meat right out of the cooker and set it on the table. The Grid Extender will support the extra weight of the top grid. I then baste, maybe turn the meat over, or maybe just glaze the meat on the lower level. I next service the meat in the middle grid while it is on my table, and then place the upper section with the middle grid back into the cooker. I then service the upper grid and place the lid back on the cooker. I can usually do this in about two minutes and I am on my way again with the cook.

Cooking on three grids in this great little cooker is not all peaches and cream!!! You will find that the middle cooking grid will run at a much lower temp than either the upper or lower grid and you will need to adjust for this in your cook. Place your smaller and less thick pieces of meat on this middle grid for the best results.

Another method for increasing the capacity of the cooker for your larger cuts of meat like pork butts is to place the meat on its side on the grids in the cooker. I will usually place them in a triangular fashion on the grids and then kinda lean them together at the top so they won't fall over. It is very easy to do 6 large or 8 small pork butts on the two grid in the cooker with this method.

A cook can also use the Weber rib racks for his large brisket flat cooks.

Tuesday, February 10, 2009

WSM Cooker / Thermometer Installation

I started doing this modification to this great little cooker in 1999-2000 when I first got started in contest cooking with the WSM's and feel it is the best way to install a thermometer in the WSM if your interest is in an ACCURATE reading of the top grid. This modification has some other advantages especially for contest cooking as well and I will get to them later.

I use an in-expensive (bout $10 bucks) Weber Replacement Gas Grill Thermometer #9815 for this modification. It can be found at about any store that sells the Weber products.


To mount the thermometer, I tape a place right in the middle between the exhaust vent and the handle on the cooker to prevent the drill from wondering or chipping the porcelain and then drill a small hole just one drill size larger than the tip of the probe on the Weber replacement thermometer. I use the larger drill size so the hole can also accommodate the Polder type of probes like the one found on my Maverick Remote Thermometer which I use for overnight cooking at contests to measure the cooking temp inside the cooker from the comfort of my bed in my EZ-UP!! This mod along with a couple of my other mods will allow you to easily cook overnight on these great cookers.


This is one nice and clean installation and the biggest advantage is it WORKS without having to add or subtract numbers to get an accurate reading of your top grid in the cooker. It is accurate within a degree or two on the temp at the top grid and then if you are using water, you would know that the lower grid is running 15 degrees lower than the top grid in the cooker. "Easy-Peasy as Mr Salmon would say".

Another advantage from this modification, is that when you go out to check or service the cooker, just get the cooker temp reading, and then pull the thermometer out of the hole in the lid, and then insert the thermometer probe into your meat on the cooker to check the internal temp of your meat. Put the cooker lid back on the cooker and slide the thermometer back into the hole and you are ready to go until the next check.

The last advantage is for your overnight cooking if you own one of those remote thermometers. You can insert the probe into the hole you have drilled for your Weber Replacement Thermometer and not have to worry about putting a kink in the probe wire by shutting the lid on the wire.

The one dis-advantage that I know of is with cooking something like a large turkey on the top grid, you may have to slightly pull the thermometer out of the hole and then kinda lean it over to the side so it will clear this large piece of meat. For all other cooks, it will work just fine.

Tuesday, January 20, 2009

Lightweight Contest Cooking / Backwoods / WSM

Wanted to do a contest over in the East somewhere to meet some e-mail friends and compete against some of the cooks we know but don't see very often and did this contest in August of 2004. The contest was in New Holland, Pa which is in the heart of Amish country and is a great event.

This contest is about 620 miles from the Po-Farm so we decided to go with just the SUV and a lightweight setup and use my Backwoods Fatboy and one WSM cooker.


Loaded up the Backwoods Fatboy and begin to wonder if we will be able to get it all in this car??


The back of the car just before we closed it up and finished packing the garbage cans on the cargo carrier.


Ready to get on the road.

Was a long drive but with our early start, we did get in to the contest site pretty early in the afternoon and got setup before dark on Thursday.


Was a hot evening and we did get to visit and meet with several other teams that arrived on that day.


My co-cook on this trip was my good friend Mike Zinkan who claims to be the Indiana Grand Champion Micro-Wave Cook and a friend from New York came down to hang with us and run our boxes.

We had planned to use the Backwoods Fatboy for our butts, brisket, ribs, anything butt, and the WSM for our chicken and also a holding oven. On Friday, one of the teams had an accident on the way to the event and lost the use of their big offset cooker and we loaned out our WSM to them for the contest. Had to double up some on the Fatboy but that cooker was designed from the ground up to do the KCBS contsts and it did us proud at this event.

We did Jambalaya for our Friday evening party and served it out of my homemade bread bowls. Was a nice treat along with a cold beer on this warm evening.

Had a few problems early Saturday morning with a Thermo-Pen that was reading about thirty degrees high and after I discovered it, had to get some meat back out of the cooler and place it back on the cooker to get it done correctly!

Anyway, got the meat all turned in and started to clean up and get ready for our trip home which was to start early on Sunday morning.

We went to the awards later in the afternoon and did very well considering my screw up on the overnight cooking.


We got one real nice trophy for our ribs that has an Amish Buggy on it along with some money.


We also received a nice plaque and a ribbon to go with our trophy along with some more money as we got 3 of our 4 meats into the top ten and ended up placing 4th overall out of this more than 60 contest team event.

Got to meet several new teams and visit with some friends and with a good finish, sure made for a nice trip home. Was a great contest and will probably go back in the future.

Sunday, January 18, 2009

WSM & RV Contest Cooking

This adventure was at the very first KCBS contest held in Mt. Vernon, Illinois about 5 years ago. At this time, the contest was in April and was at the airport and was a super soggy mess with rain and wind for most of the weekend.

We decided to take my little 22 foot 5th wheel and use the WSM's for our cookers for this contest. I used my garbage cans with the tight fitting lids to hold my cookers as it will help keep the cooking smell out of the trailer.


After we got all setup, we made a place for the cookers that was out of the rain and wind under the front of the 5th wheel.


This worked out good other than bumping my head a few times on the trailer.


Here is another picture of some of the early arrivals when the rain stopped long enough for me to use the camera.


drbbq won the pork competition at this contest.


We got a couple of calls and received a little money for our efforts.

We did stay over on Saturday evening and had much more rain and wind and ended up having to have a tow truck pull us out. Heck, I had my winnings spent before I got out of the cooking site!

Saturday, January 17, 2009

Contest Cooking With WSM Cookers

The Weber Smokey Mountain Cookers (WSM's) are a very popular starter competition cookers and are still winning many contests each year. They are really foolproof and will cook overnight without much attention and produce a winning contest product. They are inexpensive as compared to many other contest cookers, lightweight and easy to handle, and can be used for contests out of the back of your van, car, or pickup truck. With some careful planning, a good 5 day cooler, a fellow can do a whole KCBS contest on just one of these cookers!! However, most folks use at least two of these cookers for their contests.

I always keep a couple of these cookers around as I never know when I might want to do a contest without my RV that might be some distance away and at the high price of fuel, might just take the SUV and the WSM's and save a little money.


This is my lightweight and compact setup using the WSM's ready to head down the road. The car is a medium size Ford Explorer and we are heading for Charleston, Missouri which is a 335 mile trip.

I use 3 large plastic garbage cans for my two WSM cookers and this allows me to also pack up the center of the cans with other contest equipment. I have one of the cans inside the SUV and two on the back in my cargo carrier.


This is the back of the SUV all loaded up and ready to go with plenty of stuff to do a contest.


This is a picture of our site after we got it all setup and ready to cook.


A couple of other pictures of our cooking area.

We usually setup a cot inside the EZ-UP at night for my co-cook and then I use the SUV to sleep in and this works out great. We use about 1/2 the space in the SUV for our storage and the other half for sleeping.


This is my long time friend and co-cook Mike Zinkan in front of our site.


The site next to us had the Ulcer Acre BBQ team of Randy and Marla Twyford and they as well were using the WSM cookers.