
The cooker comes with holes for a rotisserie in the hood and I plug these with a couple of balls of tin foil.

This hole in the lower right side of the cooker is for a gas burner and again, I plug it with some tin foil.
With the above mods, this little cooker will run the indirect low and slow temps for hours and I use the service door to run the higher temps used for baking pizza and bread. Works great!
Now, to set the cooker up with a Pitmaster IQ 110 Auto-Temp Control.

I removed the tin foil plug from the lower right side gas burner hole so I could mount the standard manifold from the auto control. For the unit to work correctly, the blower must be below the charcoal grate level. There are three mounting holes for the gas burner and I drilled out the top one with the next drill size so it would fit the toggle bolt on the manifold.

The Pitmaster IQ 110 is one slick control if all you want is cooker control. It doesn't have any probes for the meat that goes on your cookers. It is also about half price as compared to the other units on the market. The unit in the picture with this standard manifold will fit WSM's, Weber Kettles, my two classic Char-Broils, and with another adapter will also fit both my ceramic cookers and my Backwoods cookers. I believe it could be adapted to most all charcoal cookers. Not shown in the picture is the 110 volt power adapter which also comes with the control.

I used the toggle bolt to mount the manifold to the Char-Broil 500X. I then setup the cooker for an indirect cook by loading up the right hand side with a full load of Stubb's Brickettes charcoal.
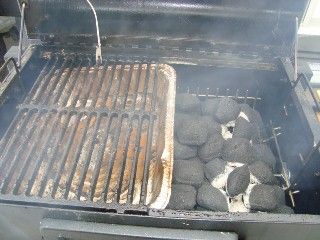
I placed two Weber fire cubes in charcoal and lit them off. I placed a half pan on the left side for the drippings and added about a cup of water to keep them from burning. If you look close, you can see the probe connected to the back of the cooking grid. This probe controls the cooker temperature.

I hooked up the Pitmaster and decided to use my 12 volt Jump-Starter to run the unit. I used a Radio Shack 12 volt adapter cord to power it up. It was cold with a light snow and I didn't want to fool around with running 110 out to the cooker so this hookup worked fine.

After my starter cubes went out, I set my Pitmaster control to about 245 degrees and started it to bring the cooker up to cooking temp. I then opened up the left side exhaust vent in the hood so I could pull all the smoke and heat across my meat during the cook.

While the cooker was coming up to temperature, I prepped my four pound fryer by cutting out the backbone and then breaking the breastbone so the chicken would lay flat on the cooker. Some folks would call this spatchcocking but I prefer the word "butterfly." I then sprinkled on my low carb rub and it was ready for the cooker.

I placed the chicken on the cooker and added a few chunks of smoke wood.

This picture shows the chicken about halfway thru the cook.

The chicken just off the cooker.
Me and Mommy split this treat as she made chicken salad with her half and I made pulled chicken with my half.

I toasted up a piece of low carb bread, added some pulled chicken, then sprinkled a little of my low carb bbq sauce over it. Added some salad stuff and cheese and made a great low carb (6 grams) meal out of it.
The Pitmaster IQ 110 temperature control is a fine product and very low cost compared to other units on the market.

No comments:
Post a Comment