Saturday, April 6, 2013

Baking on the Green Mountain Pellet Grill

I did my first baking session on my newest cooker today and it came out quite well. I decided to do a couple of small boules of no knead bread, a loaf focaccia flat bread, and  a 12” pizza. This should be a good test for the pellet grill. 

I made the no knead bread dough up yesterday and then let it sit on the countertop for about 24 hours to let it work and  sour up some. 

I then made up both the focaccia and the pizza dough with the same recipe using the following herbs in the dough--- oregano, thyme,  and marjoram. This dough went into the fridge overnight. 

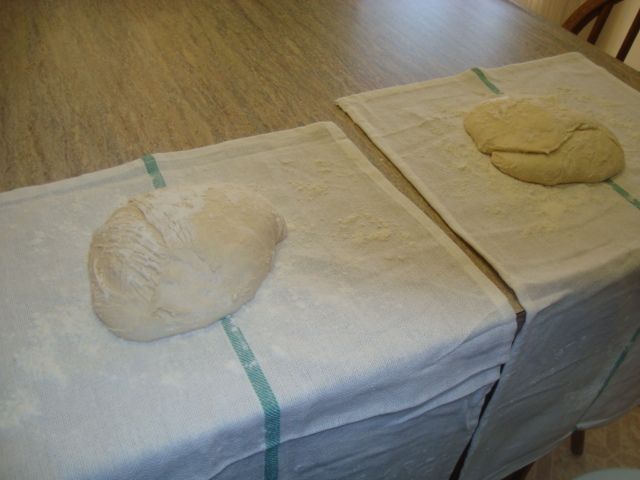
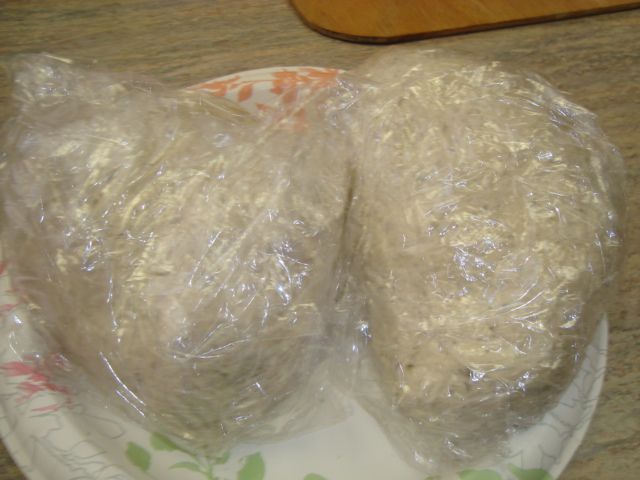
This morning, I formed the boules of the no knead bread and placed them on a dish towel for the last proof which will probably take a couple of hours. 

 photo DSC01604.jpg

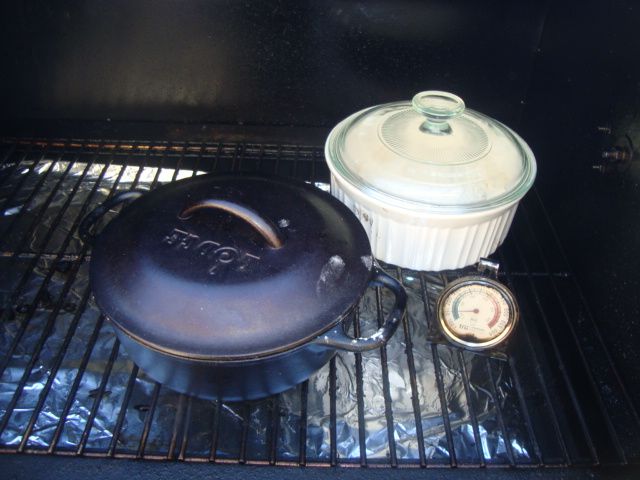
I filled the grill up with hickory pellets and fired it off and brought it up to 500 degrees and placed my Dutch oven and my ceramic baking container in it to preheat them for the bread.

 photo DSC01605.jpg

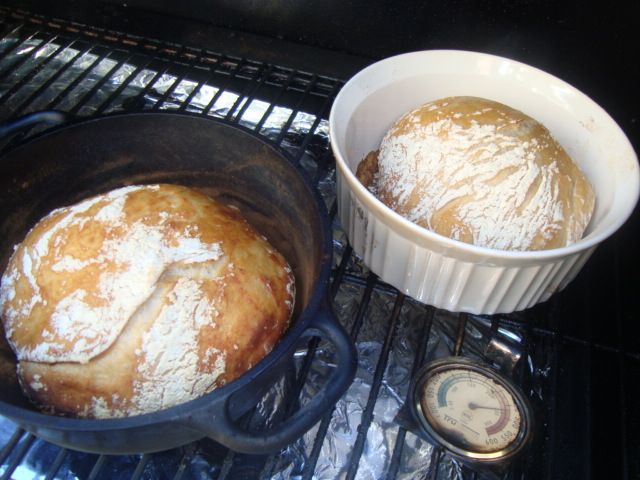
Loaded the bread into the containers and placed the lids on my containers for the first part of the bake.

After about 30 minutes, I took the lids off of the baking containers to finish browning the bread.


 photo DSC01607.jpg

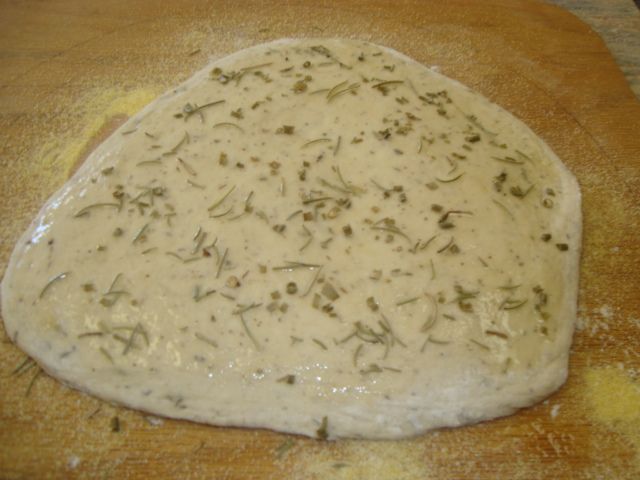
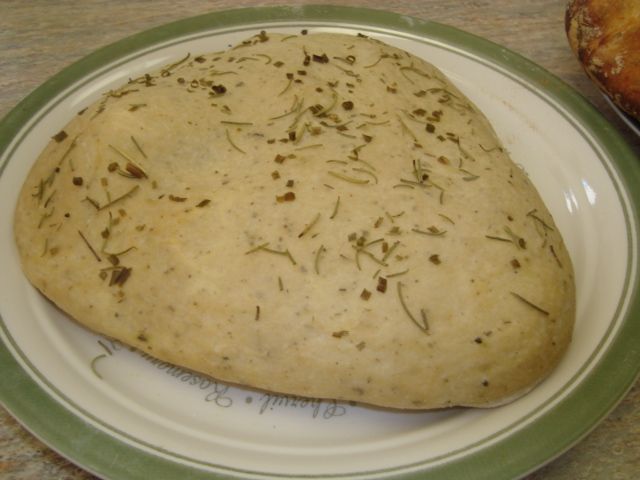
Got the focaccia and pizza dough out of the fridge and made up my loaf of focaccia on my peel and then I sprinkled on some dried chives and rosemary on top.

 photo DSC01608.jpg

 photo DSC01609.jpg

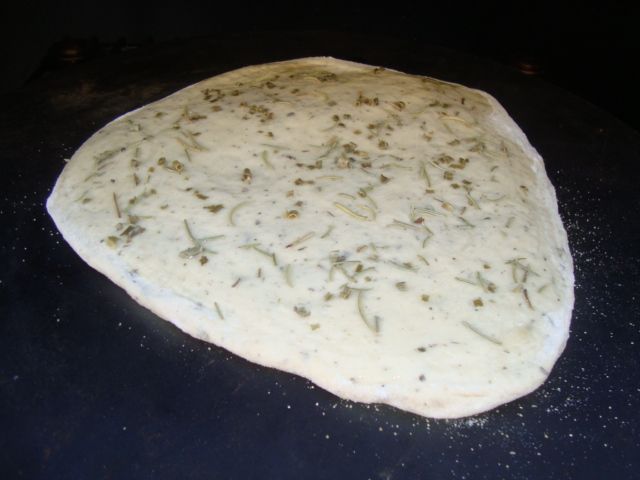
Ready for the cooker.

When my no knead bread was done and off the cooker, I set the cooker up with a raised hearth and stone for the balance of the bake and dropped the temp to about 400 degrees. 


 photo DSC01610.jpg

The focaccia baked about 18 minutes and I pulled it off the grill.

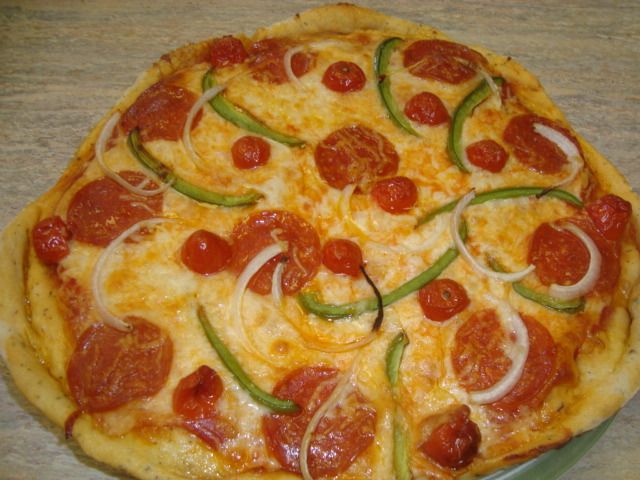
While the focaccia was finishing up, I made up the pizza on the peel. 


 photo DSC01611.jpg

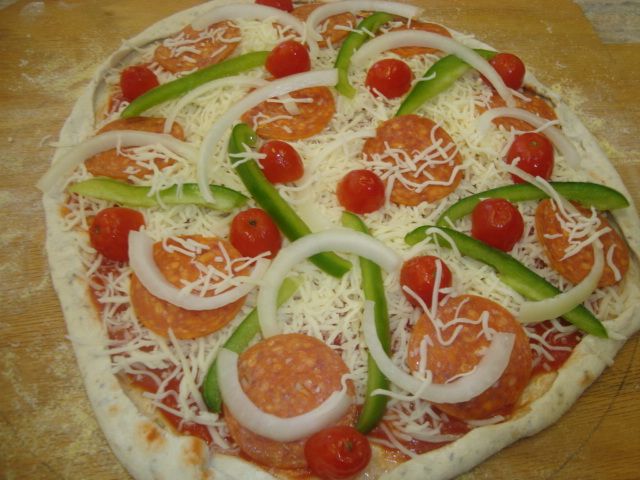
Loaded the pizza into the cooker.

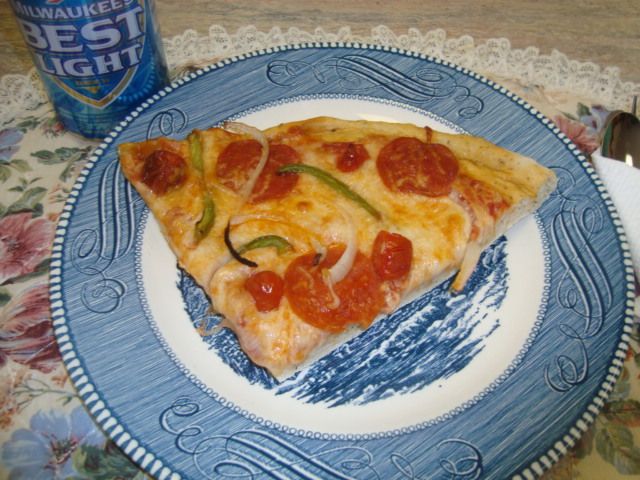
It was done in about 15 minutes.

The results of this first bake.


 photo DSC01613.jpg

Man, did this smell good!

 photo DSC01614.jpg

 photo DSC01615.jpg

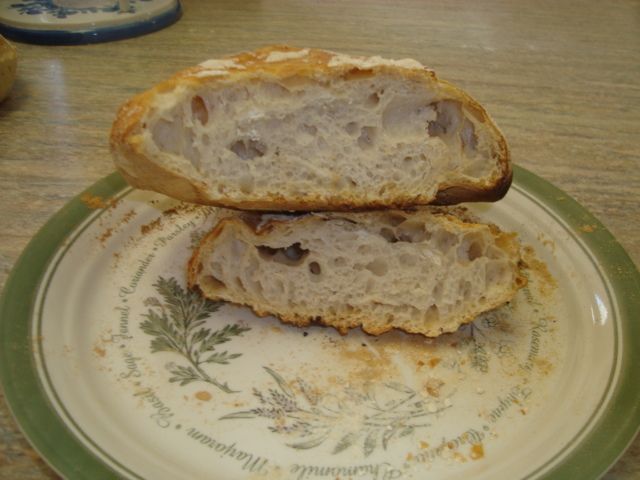
My friends,  this is some great bread. 

 photo DSC01618.jpg

 photo DSC01619.jpg

Sure can’t find much fault in this great little cooker as it does everything I ask of it and does it well.


Midwest Tavern Tenderloin

I was prepping some pork loin into some roasts and chops and decided to do a couple of good old Indiana Tavern Tenderloins. I was raised on this treat.

 photo DSC01585.jpg

I cut a couple of 3/4 pound slices off the whole loin and placed them into a one gallon zip-lock bag and then pounded them out and they were ready to be breaded.

I then rolled them around in some flour and then into my egg wash. Next step was to roll them again in some bread crumbs. Next step was to deep fry them in a large skillet in very hot lard for about 2-3 minutes. 


 photo DSC01586.jpg

Looking good just out of the hot skillet. 

 photo DSC01587.jpg

Loaded one big tenderloin up on a large bun half. I spread some mayo on the other bun half and added my lettuce, tomato, and onion. 

 photo DSC01588.jpg

Oh my...that is some good stuff. I will be well lubricated today!

Meatloaf Cupcakes with Mashed Potato Frosting

Saw a picture of this slick treat on the Web and just had to give it a go. It had a recipe and method with it but I decided to use my own recipe and method to keep it simple. 

 photo DSC01570.jpg

I mixed up a pound of burger and a pound of hot sausage. I then added an egg, some chopped onions and bell peppers along with some crackers. 

 photo DSC01571.jpg

I put the meat into the muffin tin.

 photo DSC01572.jpg

I used the end of a wooden spoon to open a couple of holes about a 1/2” deep in each piece and poured in a little catsup. It is now ready for the cooker.

I also took a head of Romaine lettuce and split it in half and drizzled on some olive oil, added some sea salt, some garlic powder, and some fresh ground black pepper. 


 photo DSC01576.jpg

This cook followed a Hot Beef Strip cook running at 150 degrees so after I got the meat off for that cook, I raised the temp on the Green Mountain grill up to 350 degrees for this cook and loaded the meatloaf and lettuce. The lettuce is loaded cut side down. 

 photo DSC01575.jpg

Romaine lettuce done with this method is just KILLER!! 

 photo DSC01577.jpg

Cooked for just a short time until I started getting some char and then turned over. Next step is to add some shredded Parmesan cheese. 

 photo DSC01578.jpg

Looked good coming off the grill. 

 photo DSC01581.jpg

My meatloaf cupcakes just off the cooker and out of the muffin tin.

I fried up some bacon for the top of both treats and then heated up some mashed potatoes and placed them into a ziplock bag and cut the end off a corner so I could use it like a pastry bag. 


 photo DSC01582.jpg

I piped the mashed potatoes onto top of the cupcakes and added some bacon bits. I also added some bacon bits to the lettuce. 

 photo DSC01583.jpg

 photo DSC01584.jpg

Made for a nice presentation and also a great meal.

Hot Smoked Beef Strips/Jerky

I am sitting here at about 3:00am in the morning writing up this cook and waiting for what I hope is our “Last Winter Blast”. In the next 24 hours, we are expecting 6-10 inches of fresh snow along with some 30mph wind gusts!

Anyway, I did a couple of cooks yesterday just ahead of the blizzard and will share this one with the folks on the forum.

I call this one “Hot Smoked Beef Strips” and they are somewhat like jerky but are not cured so there is some special care after they are cooked. In my opinion, they are so much better than regular jerky but the meat does need to either frozen or refrigerated after they come off the smoker. 

 photo DSC01563.jpg

I started with a small bottom round roast that weighed just over 3 pounds and had the meat cutter at the Kroger store cut it 1/4” thick against the grain for my meat strips. 

 photo DSC01562.jpg

This is the recipe used for my marinade.

1 cup soy sauce
1cup brown sugar
1/3 cup blackstrap molasses
2 tsp onion powder
2 tsp garlic powder
2 tsp fresh ground black pepper
1 tsp white pepper
1 tsp red pepper
2 TBL crushed red pepper flakes

This recipe may be toooo hot for some folks so you may need to cut back on the pepper flakes. 


 photo DSC01564.jpg

Next step is to cut as much fat as possible out of the meat and then cut the pieces into your jerky sized pieces. 

 photo DSC01565.jpg

 photo DSC01566.jpg

It goes into the marinade and then into the fridge for about 24 hours. Need to stir it up about every 6 hours to be sure all pieces get covered well. 

 photo DSC01567.jpg

On smoking day, it comes out of the marinade and placed on some paper towels to get rid of the excess marinade. 

 photo DSC01568.jpg

I fired up the Green Mountain pellet cooker and set the temp at the lowest it will run and that is 150 degrees and loaded the pieces of meat. Was a cool morning with the temp at about 34 degrees. I was burning hickory pellets. 

 photo DSC01574.jpg

It took about 4-1/2 hours to get the meat cooked to where I wanted it and looked good coming off the grill.

Again, this is not jerky and has not been cured so it must be refrigerated or frozen.

This is one great treat!

Brisket & Burnt Ends with A-Maze-N-Tube Smoker Accessory

This is my first brisket cook on my Green Mountain pellet cooker and it came out great. It was also the first use of my A-MAZE-N-TUBE smoker in one of my cookers.


 photo DSC01538.jpg

 photo DSC01539.jpg

I started with a CAB full packer cut brisket that weighed in at just under 13 pounds. Was really a nice piece of meat but loaded with way too much fat.

 photo DSC01540.jpg

 photo DSC01541.jpg

I trimmed off about 2-3 pounds of excess fat and then made up my injection for this cook.

2 cups beef broth
1/4 cup worcestershire sauce
2 TBL SGH rub
1 tsp onion powder
1 tsp garlic powder
1/2 tsp cayenne pepper


 photo DSC01542.jpg

The meat was injected with the above liquid which will give me some additional flavor and help keep it moist in my higher temp cook.

 photo DSC01543.jpg

The brisket was then rubbed with a generous amount of Smokin’ Guns Hot rub on both sides.

I loaded the A-Maze-N-Tube with some pecan pellets and placed it into the pellet cooker and fired it up with a propane torch. I then fired up the pellet grill and brought it up to 165 degrees which seems to be about the best temp for adding smoke to my meat. 


Pellet cookers are notorious for not providing enough smoke flavor to the product and this accessory is supposed to help and can be used on any cooker/smoker.

 photo DSC01544.jpg

Loaded the brisket into the cooker and then covered the cooker with my welding blanket as the ambient was at 33 degrees.

After about 75 minutes at the lower “smoke” temp, I raised the temperature up to about 315 degrees measured at the cooking grid for the balance of the cook. 


 photo DSC01546.jpg

I did check the meat at 3 hours into the cook and all looked good.

 photo DSC01547.jpg

The cook went an additional 1 hr and 45 minutes for a total of 4 hours and 45 minutes and I pulled the meat at an internal of about 202-205 degrees. 

 photo DSC01548.jpg

Looked good just off the cooker. I then cut the point off of the brisket and wrapped the flat in foil to rest for about an hour. I cut the point up into some nice 1-1/2” squares for my burnt ends. I placed the burnt ends in a pan and added some more rub and cayenne pepper, poured in some beef broth mixed with some Blues Hog sauce and placed them back into the cooker for about 2 more hours to get them as done as I wanted. 

 photo DSC01549.jpg

I cut a couple of nice slices of my homemade sourdough bread and loaded up one piece with some sliced brisket. I then added some pink horseradish to the meat. I added the lettuce, the onion, and the tomato to the other piece of bread. 

 photo DSC01550.jpg

I then put the sandwich together. 

 photo DSC01551.jpg

 photo DSC01552.jpg

 photo DSC01553.jpg

All plated up for serving. Made for a nice lunch.

The A-Maze-N-Tube did a great job of added some additional smoke flavor to this higher temp pellet cook.


When the burnt ends were done enough to suit me, I took the chunks out of the pan and drained them on some paper towels. They then went into the fridge for a another meal.

 photo DSC01558.jpg

This is what they looked like when I pulled them out of the fridge for my lunch.

 photo DSC01559.jpg

I selected about 5 pieces from the bowl and then heated them up for my meal and then added a dribble of Blues Hog sauce. Served with a baked potato, a piece of my sourdough bread, and some tomato slices.

 photo DSC01561.jpg

 photo DSC01560.jpg

This treat is just so much better than the standard brisket in my opinion and a fellow just doesn't get enough of it off of each brisket.