Thursday, September 3, 2009

Orion Cooker / 70 Minute Spare Ribs

I got the itch to try another cook on the Orion cooker and decided to smoke up a couple of slabs of 2.25 and down St. Louis cut spare ribs on this very unique cooker/smoker. It is advertized to cook up great "fall off the bone" baby back ribs in just and hour and ten minutes. Of course, most real bbq cooks would know that "fall off the bone" is nothing more than an overcooked rib and I sure didn't want that in my first try with ribs on this cooker!


As you can see, I did get some nice looking ribs cooked up in this first try on the Orion cooker.

I started out by setting up the cooker for the rib cook by installing the rib hangers as the ribs are cooked hanging upright in the cooker. I then wrapped my drip pan to make for an easier clean up after my cook.


Next step was to select my smoke chips and I decided to go with some sugar maple for my smoke flavor for the ribs.


I then packed in around the drip pan about 2 cups of the smoke wood which should be more than enough for the cook.


I then placed 11 of the Matchlight Briquettes in the top part of the cooker and the balance of the bag was poured around the bottom charcoal holder of the cooker and I was ready to cook.

The ribs used for this cook came from Gordon Food Service and they were the non-injected, 2.25 and down, St. Louis cut spare ribs. I started my prep by removing the membrane off the back of the slab. I then trimmed up some of the fat off of the ribs and got them ready for the cook. I rubbed them with a generous coat of Cimmarron Doc's rib rub and then cut a small slot between the 2nd abd 3rd bone so I could hang them in the cooker. The ribs going into the cooker.


I then fired up the cooker and just let it do it's thing for about 70 minutes.


I checked back after the correct time and found the cooker with plenty of the charcoal left and I was wondering about this as even the longer cooks like pork butts and beef briskets are suposed to cook with just the one bag of Matchlight charcoal for about 3-4 hours and from the looks of the remaining charcoal, it looks like it will go this long for those meats.


I pulled the top off of the cooker and other than a kinda ugly color on the ribs, they did look like they were done judging by some pull back on the bones and the flexibility of the racks. Sure would have been nice to have been able to glaze the ribs on the cooker but the cooker design doesn't lend itself very well to that kind of finish for the ribs so I came up with something that did work for this cook.


I quickly brought the ribs in the house and applied a generous coat of Blues Hog mixed with some clover honey to the slabs and then let the remaining heat in the slabs to kinda set the sauce on the slabs and after about 15 minutes, it looked pretty good.


I then cut up the ribs for serving and they did come out looking very good.


Ok, let's critique my first cook of ribs on the Orion Cooker as compared to what I can cook on my other cookers. My normal rib would have cooked for about 5 hours verses the rib on the Orion cooking in just 70 minutes.

Color...the outside color came out great as I love that deep dark red color on my finished ribs. However, the inside looks pale white and not pink showing a smoke ring like my normal ribs. The ribs were perfect in smoke flavor so I sure can live with a little more whiter inside color rib.

Tenderness...very close to what I can get off of my other cookers although I found them slightly rubberie if that is a word. They were tender enough but the texture was a little different.

Moisture...these ribs are probably as moist as anything I get off of my other cookers. Very Juicy!!

Taste...just as good as anything I can cook on any of my other cookers.

Ease of cooking...you know, light it and forget it....what could be more easier??

As a competition cook, I feel that I can cook a pretty good rib and if my best rib would be judged as a "9" off of my other cookers, I think the rib off of this Orion cooker would be a solid "8" with the method I used on this first cook.

Tailgating...what could be better?? Six, count em, 6 slabs of very tasty ribs cooked in just 75 minutes at your favorite sporting event??

In closing, I am not a shill for this cooker but just a cook that can see some applications for this very unique and inexpensive cooker. I like it!

Tuesday, July 21, 2009

Genuswine Rotisserie / Ribs and Hot Wings

I am always looking for an excuse to dig this classic little rotisserie cooker/smoker out of the barn for a cook as it is just a joy to use. I needed to cook about 3 slabs of ribs, 6 pork steaks, about 25 pieces of chicken for some hot wings, and a few hotdogs and this would about fill up this cooker. I also figured that a load of lump will fire this cooker for about 5 hours and this is the time I needed for this cook. Looks like a good match to me! I also have about 200 pounds of Royal Oak lump from offshore that has many chunks that are as large as soccer balls and this fine little cooker will burn about anything including large pieces of lump. Been trying to use this stuff up for about a year.


I rolled the cooker out to my cooking patio, hooked it up to electricity, loaded it up with that nasty lump, filled up my charcoal chimney, and got it ready to light.


I have some rather large chunks of seasoned pecan from my friend Mr. Steve Creech (ZZ-Que) that I also used for this cook.


I wasn't ready to light it up as I had some prep to get done before the fire.


I mixed up some wing breading with some flour, cornmeal, garlic powder, onion powder, black pepper, white pepper, and cayenne pepper. I then mixed up a milk and egg wash for the wings.


I ran the wings thru the wash and the breading and then placed them in the fridge for about 45 minutes to allow the breading to setup on the wings.

I then fired up the cooker as it will take about 30 minutes to get it ready for the cook.


I skinned the ribs and applied a generous coat of Smokin' Guns hot rub.


I applied Slabs pork rub to the pork steaks.


When the cooker got on temp (about 235), I added 3 big chunks of the pecan smoke wood.

I loaded up all the meat and just let the Genuswine do its thing. Once this cooker is on temp, it just stays where I set it and I really don't have to touch it again until it runs out of fuel.


Was a nice day for cooking with the temp around 82 degrees with a very light wind.


I then made up my hot sauce for the wings with some Franks, butter, honey, and more cayenne pepper.

I also mixed up my sauce for the ribs and the pork steaks. I used about 40% Blues Hog, about 40% Tennessee Red, and about 20% Tupelo honey.


The cooker just does a great job with this type of cook and all I had to do was watch it do its thing. I did wrap the ribs for a short period and sauced some of the meat but that is all I did with the cook.


The chicken wings came off first and they are great although very hot.


Pork steaks came off next and they looked good.


I also added a bowl of baked beans during the cook and they got done about the same time as the ribs.


The last step with the ribs was to glaze them on the cooker.


Ribs were last off the smoker and they as well looked great.


About 3 of the ribs, one of the very large pieces of hot wings, some of the smoked baked beans, and some fruit makes for a nice meal.

You know, I am fortunate enough to own several great cookers and this one is really a favorite of mine. It is just plain fun to use!!

Tuesday, June 23, 2009

Pizza and Calzones on a Weber Kettle

Been a long time folks as I have been busy with some contest cooking and other Summer time duties. I must do better in the future with the blog!!

Did you know that you can bake many great treats on the old reliable Weber Kettle?


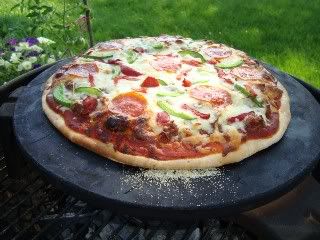
This crispy crust pizza is loaded up with some hot sausage mixed with burger, onions, bell peppers, smoked red peppers, pepperoni, cheese, and sauce. The calzone is made with the same meat and peppers, onions, sauce, herbs, and cheese.

To get started, I like to use a real stone hearth for my baking but it can be done with a different technique and I will cover that at the end of the article for the folks that don't have a stone hearth and want to consider pan baking. Both will work great on the kettle.


I set the charcoal up so it is in a circle slightly smaller than my pizza stone for this indirect bake. I always use lump charcoal for all my baking in any of my cookers/smokers. I have the charcoal containers filled about half full for this bake.


I started a small amount of lump in my charcoal chimney and when it was ashed over and ready, I poured it over the lump in my kettle.


I then added my ceramic plate setter and my 14" in diameter hearth stone. Plate setters can be found at any ceramic, clay, or kiln store. Put the lid on the cooker and waited until it got up to baking temp.


While my hearth was getting all heated up and ready, I started making up the first pizza. This picture shows the sauce, meat, and onions on the pizza.


Finished pizza ready to be carried out and placed on the kettle.


First pizza on the kettle running at about 405 degrees measured at the top of the hearth stone. Take about 18-20 minutes at this temp.


The old reliable Weber kettle doing its thing.


The pizza done and ready to come off the cooker.


While the first pizza baked, I got the second pizza ready for the cooker. I then placed this pizza on my hearth.


I think this one looked better than the first pizza.

While the second pizza was baking, I started on the calzones.


I rolled out the remaining dough and had enough for about 3 medium sized calzones left and I made up the first one.


By this time, the second pizza was ready to come off the cooker.


I then loaded the hearth with all three calzones and placed the cover back on the kettle. I made the calzones with a very thin crust and running at about 405 degrees will take about 12-14 minutes to bake.


Calzones done and ready to come off the kettle.


The results of this short baking session on the Weber kettle.


That is some good looking grub in my book.

Now, for the folks that don't have any method of making up a hearth.

The first thing you need is a way to make the cook indirect so about any type of pan will do as long as it is about as large as the pan you will use for your baking.


This is a standard sized cookie sheet that I have placed under my raised grid. You do need to get the baking grid as high up into the dome as you can for the best results. This baking grid has some bolts to raise it up to where it is needed.


This picture shows a pan on top of the setup and that is where your pizza needs to be cooked. Pan pizza is great on this cooker.


You know, it is really not rocket science and if nothing else, use a few beer cans to elevate a baking grid in the Weber kettle. Make do with whatcha got!